Hey everyone, hope you are having an amazing day today. Today, I’m gonna show you how to prepare a special dish, chicken kiev. One of my favorites. For mine, I will make it a bit unique. This will be really delicious.
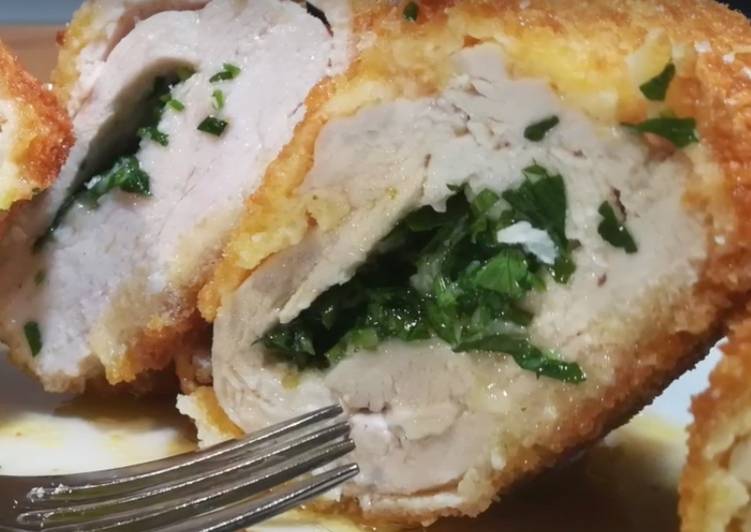
Chicken Kiev, sometimes chicken Kyiv, or just Kiev, is a dish made of chicken fillet pounded and rolled around cold butter, then coated with eggs and bread crumbs, and either fried or baked. This chicken Kiev recipe is named after the queen city of Ukraine; Kiev. Its a famous dish but most Chicken Kiev (Чикен Киев)is considered "the pinnacle of Russian cooking." This s a modified version.
Chicken Kiev is one of the most well liked of recent trending meals in the world. It is easy, it is quick, it tastes delicious. It’s enjoyed by millions every day. Chicken Kiev is something that I have loved my whole life. They’re nice and they look fantastic.
To begin with this recipe, we have to prepare a few ingredients. You can cook chicken kiev using 8 ingredients and 8 steps. Here is how you can achieve that.
The ingredients needed to make Chicken Kiev:
- Prepare 2 x chicken breast with fillet, skin and wing bone removed
- Take 2 x medium garlic cloves (or more if you a scared of vampires)
- Get 100 g x unsalted butter
- Take 2 x tbsp chopped parsley
- Prepare for the crumb
- Prepare 2 x eggs
- Make ready some seasoned flour
- Get some breadcrumbs
Chicken Kiev is a drool worthy dish straight from Eastern Europe. You wrap chicken around a scrumptious garlic butter interior before dredging it in breadcrumbs and flour. Chicken Kiev consists of a boned, flattened chicken breast that is rolled around chilled herb butter, breaded, then fried. Although the dish is very popular, no one knows where it came from or how it got.
Steps to make Chicken Kiev:
- To make the garlic butter crush the garlic with a pinch of salt then add the parsley and butter and pound to a smooth consistency. I used a pestle and mortar but you can use any sort of food processor, or use the flat edge of a large knife to scrape the garlic smooth. Spread the butter into a flat rectangle about 6mm thick.
- Wrap the butter in cling film and freeze for 1 hour to set hard, in the photos here I remove the skin and the fillet which is the small goujon sized strip under the breast, we will use this fillet later.
- You need to make a pocket inside the breast WITHOUT piercing the other side so the melted butter stays inside the breast, to do this start at the fat end and with a thin knife insert down the breast as far as you dare about 2/3 or 3/4 but no further. With a gentle sawing motion make the insertion wider and you can use your finger to make sure there is room for the butter to fit. The fillet will be used to encase the end so you must butterfly this.
- Once butterflied use a meat mallet or rolling pin etc to flatten to a disc about 3mm thick, take half of the fully hardened garlic butter and insert into the pocket, really push it fully so that it is not protruding, then wrap the exposed end of the breast with the flattened fillet. This step is not crucial but it really helps to keep the butter inside, you can use a cocktail stick after crumbing which helps if you don't have the fillet to use.
- So double breadcrumb these breasts, into the flour and shake off the excess, then into the beaten egg use a slotted spoon so that your hands don't get wet. Then into the crumbs, then back into the egg and crumb one more time for an extra layer of protection.
- Put the crumbed breasts into the freezer for up to 20 minutes to really firm up the butter once more before shallow frying. Heat a heavy frying pan with 1 cm of oil over a medium heat, carefully place in the breast one at a time and fry until beautifully golden on all sides.
- Bake breast at 190c for 20 minutes and then cover loosely with tin foil and keep over the oven or warm area to rest for 5 minutes, they will continue to cook as they rest, then serve and enjoy.
- Https://www.youtube.com/watch?v=aDsqMpyr-dQ these screen shots are taken from my youtube channel, feel free to watch the link as in the video I demonstrate 2 methods which you may find interesting. Thanks x
Add me and type "!buy Chicken Kiev". Remove chicken Kiev from the freezer, unwrap. Coat first in flour (it will absorb extra liquid) then dip each. View map. "Try the Chicken Kiev, Herring/pickle sa." "The chicken Kiev was fantastic and the." Chicken Kiev is a popular chicken dish which was, oddly enough, invented in France and named in New York, despite what the Ukrainian name might suggest. It is reasonably easy to prepare and is worth the time.
So that is going to wrap it up for this special food chicken kiev recipe. Thanks so much for your time. I’m sure you will make this at home. There is gonna be interesting food at home recipes coming up. Don’t forget to save this page in your browser, and share it to your family, friends and colleague. Thanks again for reading. Go on get cooking!