Hey everyone, I hope you’re having an incredible day today. Today, we’re going to prepare a distinctive dish, cheese chocolate wrapped mochi made with pre-cut mochi. It is one of my favorites food recipes. For mine, I will make it a bit unique. This is gonna smell and look delicious.
Cheese Chocolate Wrapped Mochi made with Pre-cut Mochi is one of the most favored of recent trending meals on earth. It is easy, it’s quick, it tastes yummy. It’s appreciated by millions daily. Cheese Chocolate Wrapped Mochi made with Pre-cut Mochi is something that I’ve loved my entire life. They are nice and they look fantastic.
Making mochi from glutinous rice takes a long time and effort, therefore most families don't make mochi from scratch anymore. If we want to enjoy freshly These days to enjoy mochi all year round and during the Japanese New Year, we can buy these pre-cut Japanese mochi (Kiri Mochi, 切り餅). The Best Mochi Dessert Recipes on Yummly
To begin with this particular recipe, we have to prepare a few components. You can cook cheese chocolate wrapped mochi made with pre-cut mochi using 17 ingredients and 24 steps. Here is how you cook that.
The ingredients needed to make Cheese Chocolate Wrapped Mochi made with Pre-cut Mochi:
- Prepare [Filling] For 6 pieces
- Make ready 50 grams Cream cheese
- Take 30 grams White chocolate
- Prepare [Cocoa Milk Gyuuhi Rice Dough] For 3 pieces
- Prepare 1 piece Pre-cut mochi
- Get 1 tbsp Water
- Get 1 tbsp Sugar
- Take 2 tsp ●Cocoa
- Prepare 2 tsp ●Condensed milk
- Get 1 Cocoa (for coating the mochi)
- Prepare [Matcha Milk Gyuuhi Rice Dough] For 3 pieces
- Make ready 1 piece Pre-cut mochi
- Get 1 tbsp Water
- Get 1 tbsp Sugar
- Make ready 1/2 tsp ◎ Matcha
- Take 2 tsp ◎Condensed milk
- Prepare 1 Katakuriko, matcha (for coating the mochi)
It comes perfectly sweetened and ready. Mochi is usually made from sweet rice (also called Mochi rice) cooked and pounded until it becomes a paste that is very sticky and smooth, then formed into We used Mochiko which is basically powdered sweet rice. It becomes Mochi by adding water and steaming. Because it is a powder, it is easier to.
Steps to make Cheese Chocolate Wrapped Mochi made with Pre-cut Mochi:
- Weigh 50 g of cream cheese. Put in a heatproof container.
- Chop the white chocolate, and put into a heatproof container.
- Melt in a double boiler heated to about 50°C. Carefully mix so that the hot water doesn't get into the bowls. Remove from the double boiler when mixing to be safe.
- Add the white chocolate to the cheese that has been mixed to a smooth texture, and mix. Add in 3 batches and mix.
- Transfer to a sheet of non-stick parchment sheet, and divide into about 6 portions. Chill for about 10 minutes in the refrigerator.
- When the dough has cooled and set so it can be handled easily, form it into balls. Return to the refrigerator. Next, make the mochi dough!!
- Before making the mochi dough, mix the condensed milk and cocoa to make a paste.
- Cut the piece of pre-cut mochi into 8 to 16 pieces with a knife. Place in a heatproof dish, and add the sugar and water. Cover lightly with plastic wrap.
- Heat for 30 seconds in a 500 W microwave. Remove, and mix well with a rice paddle, etc. Cover with plastic wrap again, and microwave.
- After mixing the dough that has been heated twice, add the condensed milk and cocoa paste prepared in Step 7. Mix well.
- Heat one last time (3rd time). After heating, mix the mochi dough and it's ready. Now it's time to form the balls!!
- Spread cocoa powder on a sheet of non-stick parchment paper. Prepare a dry and clean brush. Finish this step while heating the mochi dough if possible.
- Drop the Step 11 mochi dough onto the cocoa prepared in Step 12. Using the brush, coat the tops well with cocoa powder.
- Divide into 3 portions and form into circles. Brush cocoa to places that doesn't have cocoa, and brush off the excess.
- When the mochi dough as cooled slightly (about 5 minutes) place the dough in your hand, and put a piece of cheese chocolate on top…
- Using your other fingers, pinch and wrap. Tug the sticky mochi dough from underneath and press the seams together.
- When the ends are secured, brush cocoa powder on the sticky places
- Double the mochi dough (use two pieces of pre-cut mochi) to make 6 pieces of the same flavor. Here, I made cocoa flavor with one piece, and matcha flavor with the other.
- Mix 1/2 teaspoon matcha into the condensed milk to make a paste. Mix into the mochi dough that has been heated twice. Microwave again.
- For the matcha version, coat with katakuriko.
- Make 3 pieces in the same way as the cocoa dough. Prepare a different brush from the one used for the cocoa version.
- After wrapping the balls, coat the entire surface with katakuriko, and brush off any excess. Brush with matcha to finish, and they are ready.
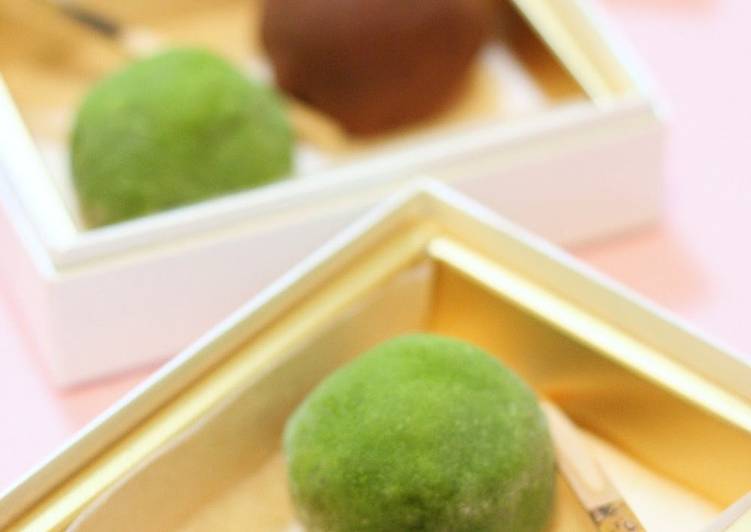
- Cocoa mochi from the side.
- Matcha mochi from the side.
Mochi bread is made with the same type of flour, which contributes to its chewy texture. Brazilian cheese bread is mainly made with tapioca/cassava flour which results in pretty similar texture and To reheat in oven or toaster oven, spray with some mist of water and then wrap them in aluminum foil. Tip (Shaping the mochi) Mochi can be very messy if you try to ball them up into individual size pieces. I like to drop all of the mochi onto a plastic lined grill pan. There are mochi trays in Japan with both horizontal and vertical lines that leave an imprint on the mochi so you can cut it after it cooks.
So that is going to wrap this up for this exceptional food cheese chocolate wrapped mochi made with pre-cut mochi recipe. Thank you very much for your time. I’m sure you can make this at home. There’s gonna be interesting food in home recipes coming up. Remember to save this page in your browser, and share it to your family, friends and colleague. Thank you for reading. Go on get cooking!